CL™ Self-Clinching Nuts
Installation – SH™ Nuts
PDF page 35 · PEM Fastener Catalogue
- Prepare properly sized mounting hole in sheet. Do not perform any secondary operations such as deburring.
- Place fastener into the anvil hole and place the mounting hole (preferably the punch side) over the shank of the fastener as shown in diagram to the right.
- With installation punch and anvil surfaces parallel, apply squeezing force until the head of the nut comes into contact with the sheet material.
PEMSERTER® Installation Tooling
Unified
| Thread Code | Anvil Dimensions (in.) | Anvil Part Number | Punch Part Number | |
|---|---|---|---|---|
| A ±.002 | P ±.005 | |||
| 0420 | .454 | .150 | 975200038 | 975200048 |
| 0518 | .517 | .200 | 975200039 | 975200048 |
| 0616 | .280 | .250 | 8020084(1) | 9752000901400 |
Metric
| Thread Code | Anvil Dimensions (mm) | Anvil Part Number | Punch Part Number | |
|---|---|---|---|---|
| A ±0.05 | P ±0.13 | |||
| M6 | 11.53 | 3.81 | 975200038 | 975200048 |
| M8 | 13.13 | 5.08 | 975200039 | 975200048 |
| M10 | 7.62 | 6.35 | 8005682(1) | 975200901400 |
(1) Large nut anvils use protrusion to locate part instead of counterbore.
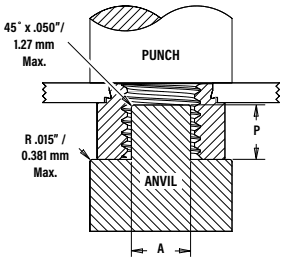
Installation drawing callouts:
- Counterbore anvil – Thread Sizes 1/4-20 to 5/16 and M5 to M8. Punch; Anvil; A; P.
- Protrusion anvil – Thread Sizes 3/8 and M10. Punch; Anvil; A; P; 45˚ x .050"/ 1.27 mm Max.; R .015" / 0.381 mm Max.
Installation Notes
- For best results we recommend using a Haeger® or PEMSERTER® press for installation of PEM® self-clinching fasteners. Please check our website for more information.
- Visit the Animation Library on our website to view the installation process for select products.